
Welcome to the members’ lounge of Better Chews. How’s it hangin’?
On the main newsletter, I showed you how to create a genoise sponge cake that would give my wheat genoise a run for its money. Today for subscribers, I want to show you how to transform this sponge into an impossibly delicious layer cake. More than just showing you these exact components, I want to encourage and guide you to craft the layer cake that represents you, your kitchen, your setting, your season, your desires, your family & friends. The lovely thing about layer cakes is, once you feel confident with them, you can create endless variations with whatever sounds yummy to you and whatever fruit is at its peak. Eventually, I will have an archive of cake component recipes that I will assemble into a matrix so you can glance over, choose your components, and make your ideal cake. For now, let me show you this Green Tea & Summer Berries Layer Cake and I’ll advise you on the ways you can vary each component.
First, some general advice about layer cakes:
I almost always split the creation of a layer cake into three days. On day one, I bake the sponge and prepare the syrup and any fillings. This gives all the components time to cool completely and allows for seamless construction the next day. On day two, I prepare the frosting just before assembly and then everything comes together very swiftly. I fridge the cake overnight to let all the flavours meld, then I decorate and serve the cake on day three.
If you’re nervous about constructing the layer cake ‘freestanding’, you can construct it inside a cake tin lined with plastic. I will show this technique to you very soon, but to put it simply: line a tin of the same size as your cake layers with plastic, then put in the sponge, soak it, create a barrier of frosting, fill, and repeat. Press the plastic down and refrigerate. The next day (or after a few hours), remove from the tin, peel away the plastic, and you’ll have an incredibly straight and even cake. Then frosting the exterior is a breeze. This is the cheat code for a layer cake that looks super professional and sleek.
I don’t love buttercream. I like it! But I always prefer a whipped dairy frosting, like the one I include here. We’ll cover meringue buttercreams in the future, because they’re more stable and thus more appropriate for event cakes and complex decor. The frosting I’m showing you today is nonetheless stable and, in my opinion, far more delicious than any buttercream.
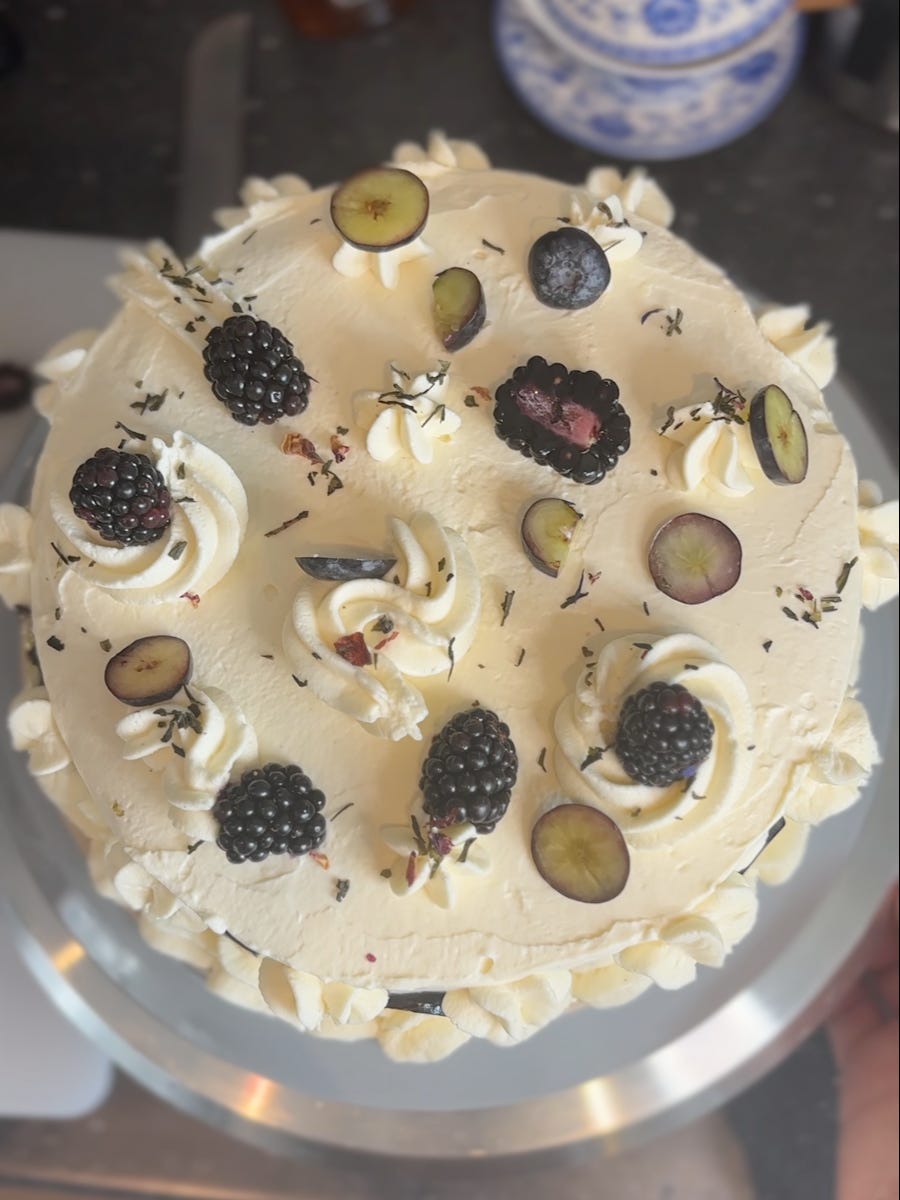
I know this is easier said than done, but try to not overthink the decor. Pipe some swirls, throw on some fruit, call it a day. My hot take is that inedible components never belong on a layer cake, including flowers. It is very much not chic to force people to remove something from a plate of food. Flowers are gorgeous, and they have their place on wedding cakes etc. where they are heavily photographed and then cut and given to guests by staff (who can remove inedible components beforehand). But for the vast majority of scenarios, people should be able to lick their plate clean, ya feel me? Similarly, I believe components should never be included that do not suggest what is inside the cake. For example, I do not advise you to put flaked almonds on a cake if there are no almond components inside. This is misleading, and if you include fantastic ingredients inside, those same ingredients on the exterior will be more than enough to create beauty and intrigue.
As I said in the genoise recipe, I believe this cake is capable of transforming any layer cake-hater into a heartily surprised loverrr. Let’s get into it:
Recipes
Green Tea Syrup
125g water
125g caster sugar
1 tbsp loose-leaf sencha green tea (not matcha)
Brew tea with very hot water a few minutes off the boil. After 5 minutes of steeping, strain and press water out of tea. Add 125g caster sugar to the tea and stir until sugar has dissolved, then transfer to fridge to cool completely.
Variations: Syrups can be anything you can imagine, as long as the liquid:sugar ratio is roughly 1:1. You can stew fresh or frozen fruit into syrup and strain. You can include vanilla beans, sumac, fresh or dried herbs, fig leaf, liqueurs, wine, coffee, rose petals, spices, orange blossom…I could go on. In this case, feel free to substitute the sencha tea for any other tea you desire. If the final syrup isn’t flavourful enough for your taste, because of your choice of tea, just brew again even stronger (more tea and/or more steeping time) before adding sugar. Black tea is delicious with stone fruit, especially plums. White tea is gorgeous with floral flavours. Rooibos offers an earthy backdrop to chocolate.
Blackberry & Blueberry Compote
290g blueberries & blackberries (I did half/half)
63g sugar
19g fresh lemon juice
1/2 tsp agar agar powder
Pinch of fine sea salt
In a saucepan, combine the berries, sugar, lemon juice, agar agar, and salt and bring to a rolling boil over high heat. Reduce to medium and boil for 7-8 minutes, stirring frequently to prevent burning. Remove from the heat and let cool for five minutes.
Transfer the mixture to a food processor (or use an immersion blender) and puree slightly so the compote still has some texture. Let cool completely and store in fridge for up to 2 weeks or freeze for up to 2 months.
Variations: Use this as your blueprint to make a compote with any fresh/frozen fruit. The agar is key here to make it set up enough to be a stable filling without worrying about it leaking out the sides, and without fussing with starch or pectin (though we’ll cover these methods later). Add 2 tsp of dried sumac for an extra citrusy, spicy note.
Whipped Mascarpone & Cream Cheese Frosting
450g full-fat cream cheese
450g mascarpone
200g icing/confectioners’ sugar
400g whipping cream (~40% fat)
vanilla extract or paste or beans
fine sea salt
Combine cream cheese, mascarpone and icing sugar in the bowl of a stand mixer and whisk on medium-high until combined, then stream in whipping cream until thick and well-combined, a few minutes. You’re unlikely to over-whip this, so don’t be afraid to beat it for a couple minutes. Scrape the bowl down the sides and across the bottom.
Add vanilla and salt, whisk on medium-low, and taste. Add more vanilla and salt until it makes you hum.
Variations: Add liqueur at the end (as long as the colour works with your vision). Infuse the whipping cream with fresh or dried herbs overnight before straining and adding. Add some tahini or black sesame paste. Swirl a jam in at the end to create streaks of colour and flavour, or the thick syrup from sour cherry jam to create a vibrant, pink-hued frosting.
You will also need one 8-inch genoise sponge cake, recipe here.
Now for the assembly:
There are four steps to constructing a layer cake: dividing the sponge, filling the layers, coating the exterior, and adding decor.
Dividing the sponge: A cake turntable is very useful here, though not strictly necessary. Place the genoise on something that can be moved around, like a proper cake board, a piece of cardboard cut into a slightly larger circle than the cake base, or–as I use here–an inverted plate with a circular piece of parchment between the cake and plate. Create marks on the side of the cake to divide it into three even slices. With each mark, saw with a serrated knife (that is longer than the cake’s diameter!) back and forth while you slowly rotate the turntable until you have cut into the perimeter of the cake, then continue rotating and move the sawing knife further and further into the center of the cake until you feel the layer separate from the cake beneath. I usually get eye-level with the cake to ensure I am cutting a straight line. Do this once more and you will have three even layers of sponge.
Filling the layers: Either working ‘freestanding’ or inside a plastic-lined cake tin (as described in the intro), put what was originally the top of the cake on the base, with the crumb layer facing upward. We want to soak the crumb of each cake, not the exterior layer that was exposed to the cake tin/air, as this ‘skin’ does not readily absorb syrup. Generously soak the sponge with syrup, ensuring each and every ‘bite’ of the cake will have syrup inside. As you continue making layer cakes, you’ll learn the amount of syrup that you prefer. If this is new for you, include more if in doubt: this genoise can handle it. Create a barrier of frosting around the perimeter, then add the compote to the middle and spread evenly. The compote should be just below the height of the barrier. Add the next sponge, which should be what was originally the center slice of the cake (so exposed crumb on either side). Repeat the soaking, barrier and filling. Then soak the final layer (the one that was originally the bottom of the cake with a flat base), crumb-side up, and invert this sponge onto the top of the layer cake so the darker ‘skin’-side is facing upward. Because we’re using the bottom layer as the top, we have a perfectly flat surface to frost. If constructing your cake inside a lined tin, you will invert the order of layers, because you will flip the cake to unmould.
Coating the exterior: Plop some frosting onto the cake and spread all around in a thin layer to seal the cracks between layers and create a base for your decor. This is often called a ‘crumb coat’. You can refrigerate the cake here if anything is feeling wobbly. With these components in particular–the frosting, syrup, compote and sponge all being cold or room temp–I was able to immediately decorate with no worries. This is the stage where I advise you to refrigerate the cake overnight to allow all the flavours to meld together. Or you can refrigerate overnight with the decor added if you are not concerned about the decor becoming dry or otherwise losing flavour/attractiveness.
Adding decor: Add a generous amount of frosting on top and spread around, letting it fall down the sides and continuing to spread it there. No hurry. Keep adding frosting, removing where it’s excessive, using a bench scraper to create straight sides as you rotate the turntable, etc. Go for something swirly or something sleek. Don’t overthink it, like I explained in the intro. Pipe some swirls, cut up fresh fruit and arrange it as you please. Sprinkle some of the dried tea you used to create your syrup (as long as it’s not bitter or otherwise unpleasant). When you feel like there’s a couple more things to add, it’s probably time to stop. Simplicity triumphs over excess. Unless you find that excess is your style, in which case: keep it coming.
Then cover the cake and keep it in the fridge until it’s nearly ready to be served. Layer cakes like this one improve massively with 12+ hours in the fridge. The genoise soaks up the flavours around it and everything melds. Without fail, if I eat a layer cake on the day it was made, I think ‘this is aight’. Then I eat the same layer cake the next day and it gives me goosebumps. Patience is a virtue or whatever. Speaking of which, let the cake sit out for 45-90 minutes before it’s eaten. The softening of the frosting and sponge make a huge difference in the perception of moisture and tenderness. There’s no butter here though, so even right out of the fridge, it’s lush.
This layer cake can survive being out for a few hours. You can bring it to the park and as long as it’s not excessively hot, it will maintain shape very well. Technically you should consume it within 4 hours out of the fridge, because of all the dairy, but you can certainly re-fridge and consume later as long as it smells/looks fine.
Soon, I will create a full-length video tutorial to show this process in greater detail. In the meantime, ask me anything you’re uncertain about and I’ll do my best to help. Like most things, crafting components and constructing layer cakes is something that simply gets easier with time. If you’re not stoked about how your first one looks, it’s very likely that it will still taste amazing if you followed this recipe. Then, your task will be to continue making layer cake until you can look at it with pride.
There’s something so special about a beautiful piece of art that you can actually consume. I hope, if you’re new to layer cakes, that this serves you as a guide and you feel confident embarking here and sensing the inherent freedom within this ‘recipe’. You can tinker with literally any component of this. For you professionals, I hope this guide has shown you how to construct a gluten-free layer cake that will awe your clients.
Thank you so much for being a paid subscriber. Your support means I can dedicate myself to providing you all with top-notch recipes and responding to your queries. Follow me on Instagram for videos of my recipes and feel free to comment below, DM me, or email me at zak@better-chews.com
Next week I will share my recipe for buns, and subscribers like yourself will also receive a recipe for some gorgeous coconut buns and other topping ideas.